Can the reporting data be deleted?
In the aSISt application, it is possible to delete reporting data by users with an appropriately extended license. However, it is an irreversible process, so it is recommended to make a backup in advance.
Detailed instructions for deleting reporting data are described in “Application_basics” in chapter “11.1 Reporting data deletion polices”.
How to disable automatic opening of Office files in Microsoft Edge browser?
To disable automatic opening of Office files in the Microsoft Edge browser, please:
1. Use the three dot icon
2. Select “Settings”
3. From the menu on the left, select “Downloads”
4. In the “Open Office files in the browser” item, click on the slider, moving it to the left

How can you export and import Oracle database contains aSISt scheme to another server?
To export the database:
1. After starting the sql client, e.g.:
- <CMD> sqlplus /nolog
- <SQL> connect system/pass as sysdba;
2. Create a new directory in the Oracle database to which the export will be performed and grant it the required permissions
- <SQL> CREATE DIRECTORY asistdmpdir AS ‘C:\asistdmpdir’;
- SQL> grant read, write on directory asistdmpdir to asist5;
3. Check if the directory for the ORA engine has been created correctly:
- <SQL> SELECT directory_name, directory_path FROM dba_directories;
4. Perform database export:
- expdp asist5/hasło_użytkownika DIRECTORY=asistdmpdir DUMPFILE=asist.dmp LOGFILE=asist_export.log
To import the database:
1. Create a new PDB database, to which the schema will be imported:
- SQL> create pluggable database asistpdb admin user asistdba identified by asist file_name_convert=(‘ D:\app\oracle\oradata\orcl\pdbseed’,’D:\app\oracle\oradata\orcl\asistpdb’);
- SQL> alter pluggable database asistpdb open read write;
- SQL> alter session set container=asistpdb;
- SQL> alter pluggable database asistpdb save state instances=all;
2. Create a new directory for import and grant it the required permissions:
- CREATE DIRECTORY asistdmpdir AS ‘C:\asistdmpdir’;
- SQL> grant read, write on directory asistdmpdir to system;
3. Create a user and tablespace:
- SQL> create tablespace users datafile ‘D:\app\oracle\oradata\orcl\asistpdb/asist01.dbf’ size 1G autoextend on;
- SQL> create user asist5 identified by asist5 default tablespace users;
- SQL> grant connect, resource, create any view, unlimited tablespace to asist5;
4. In the tnsnames.ora file, add an entry about the plug-in database:
ASISTPDB =
(DESCRIPTION =
(ADDRESS_LIST =
(ADDRESS = (PROTOCOL = TCP)(HOST = serwer)(PORT = 1521))
)
(CONNECT_DATA =
(SERVICE_NAME = asistpdb)
)
)
An example file location is: D:\app\oracle\product\12.2.0\dbhome_1\network\admin
5. Perform an import from the system user:
- impdp system/system@asistpdb directory=asistdmpdir logfile=imp.log dumpfile=asist.dmp
Additional parameters for the import command:
remap_schema – to use when changing the target schema, syntax: oldUser:newUser np. remap_schema=asist5:asis
remap_tablespace – to use when changing target user space, syntax: oldTablespace_newTablespace np. remap_tablespace=users:asistdata
Link to a helpful article (import syntax a bit simpler):
http://orafaq.com/wiki/Datapump
For the aSISt application to connect to the new Oracle database, change the database address in the db.properties file by entering:
- db.url=jdbc\:oracle\:thin\:@serwer\:1521/asistpdb
How can I back up / restore the Oracle Database?
To perform backup/restore operations on DB we suggest running the Oracle in-build tool – RMAN. Run the following commands:RMAN backup:
cmd
rman target=sys@asistpdb
RMAN > backup database;RMAN restoring:
cmd
rman target=sys@asistpdb
RMAN > shutdown immediate;
RMAN > restore database;
RMAN > recover database;
RMAN > startup;
By default, the Oracle Database works in NOARCHIVELOG mode, which does not allow restoring the data along with database transactions that took place between subsequent archives.
The “Backup Database” script run for Oracle working in default NOARCHIVELOG mode returns a warning about this option. Agreeing to backup in this mode results in the creation of a copy of the data (after automatically stopping and restarting the database using the script) without the possibility of restoring the above transaction.
Switching the database in ARCHIVELOG mode causes the database creation process to be performed in the background, and the archiving of the restore logs is performed in the so-called required FRA restore (FLASH RECOVERY AREA).
In this mode, the database allows to make backups without stopping the database engine, but the consumption of the FRA area increases significantly. In this case, Oracle database developers recommend moving the area in question to a separate partition, setting its size to at least 15 GB and regularly perform “backups” to prevent overflow of this area and loss of log data.
Transaction recovery log archiving mode avoids data loss, also as a result of critical media errors, the default NOARCHIVELOG option is sufficient to provide protection against operating system errors and errors of the database instance itself.
More information on the above issues can be found in the official online documentation of the ORACLE XE database:
http://download.oracle.com/docs/cd/B25329_01/doc/admin.102/b25107/toc.htm
If you need to create and restore copies of Oracle databases with user-defined settings, Oracle distributions also include a standard copy management tool, accessible from the installation directory:
– subdirectory „oraclexeapporacleproduct10.2.0serverBIN” -> „rman.exe”
– example command „rman nocatalog target XE” allows you to connect the tool to a database instance called XE (after entering the SYS user password) to make a copy
– rman command:
backup full database format „d:/backup/rman_%T_%s_%p.bus”;
allows you to create a full copy of the database in the target directory d:/backup.
Note: if the database does not work in ARCHIVELOG mode, it must be manually stopped and “mounted” using the rman command string or SQL interpreter:
shutdown immediate
startup mount
After successful backup, the SQL command “alter database open;” allows you to restart the base engine.
• The basic process of restoring the last copy of the database using the rman program is limited to issuing the command string:
rman nocatalog target XE (next the SYS user password)
shutdown immediate
startup mount
restore database;
recover database;
alter database open;
exit
Rman command “restore database;” restores the last database archive existing in the current control file (command ‘list backup;’ – displays the content of the control file)
the recover command allows you to check the consistency of the database.
After completing the restoration process and starting the database, it is recommended to check if all necessary system spaces (tablespaces) and data files are online:
SQL > select TABLESPACE_NAME,STATUS from dba_tablespaces; SQL> select FILE#,STATUS,ENABLED,NAME from v$datafile;
Operations related to extracting control files from total copies, restoring specific arrays or so-called backup sets are more complicated issues, the description of which can be found in the source Oracle database documentation.
How can I migrate data from Derby to Oracle?
To transfer a database from Derby to Oracle, follow the instructions below:
It is recommended to prepare a new PDB database for aSISt (asistPDB). If you have PDB database, you can use it. It is not necessary to create separate PDB database for aSISt. Using the root database is not recommended.
To create asistPDB you can:
- use sql:
<SQL> CREATE PLUGGABLE DATABASE asistpdb ADMIN USER asistdba identified by “asist” DEFAULT TABLESPACE USERS DATAFILE ‘D:\APP\ORACLE12\ORADATA\ASIST\ASIST\USERS01.DBF’ SIZE 1G AUTOEXTEND ON FILE_NAME_CONVERT=(‘D:\APP\ORACLE12\ORADATA\ORCL\PDBSEED\’,’D:\APP\ORACLE12\ORADATA\ASIST\ASIST\’);
<SQL> ALTER PLUGGABLE DATABASE asistpdb open read write;
<SQL> ALTER PLUGGABLE DATABASE asistpdb SAVE STATE;
Note: The path in the first SQL has to define the existing place and files.
- use the instruction available on the Oracle’s website.
You can use SQL to create a new Oracle user:
<SQL> alter session set container = asistpdb;
<SQL> create user asist identified by asist default tablespace users temporary tablespace temp;
<SQL> grant connect,resource,create view to asist;
<SQL> GRANT UNLIMITED TABLESPACE TO asist;
SQL can be modified if you need to change the path or database name, user name.
Connect with the new asist user.
Next, it is required to prepare backup of Derby database.
If you have the backup, you can start the migration.
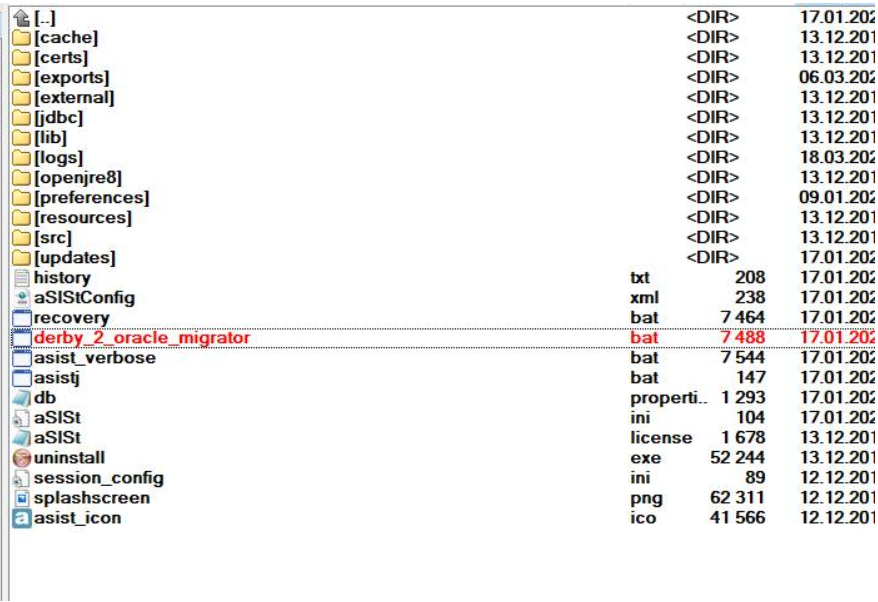
Run the derby_2_oracle_migrator.bat, which is available in the aSISt5 directory:
In the wizard it is required to fill:
User: asist (migr in attached screenshots)
Password: asist (migr in attached screenshots)
Address: jdbc:oracle:thin:@//localhost:1522/asistpdb (format for Oracle 12, you have to fill the address for the new asist connection including the proper PDB database – orclpdb in my case)
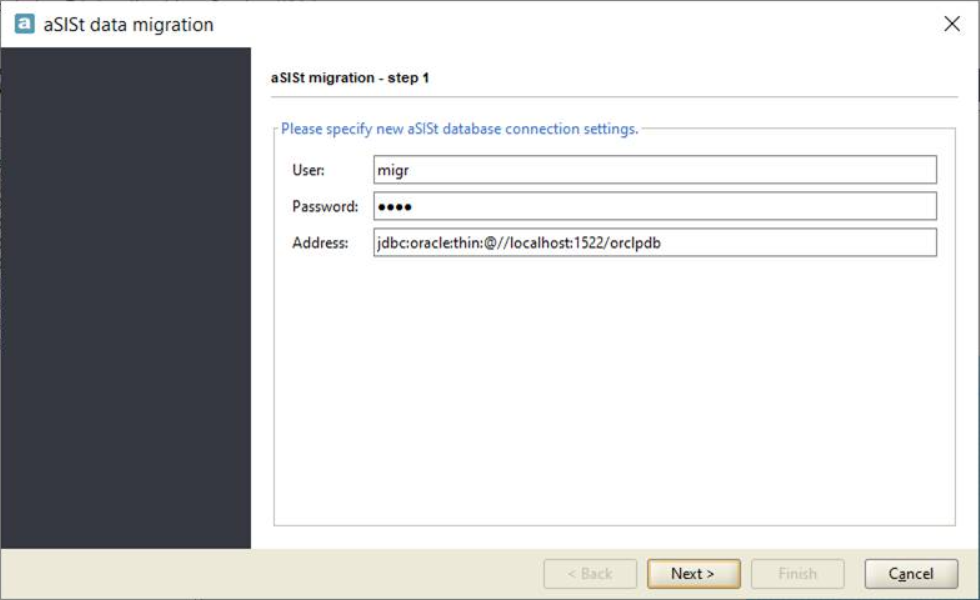
If the user, password, and address are correct, please use the “Next” button.
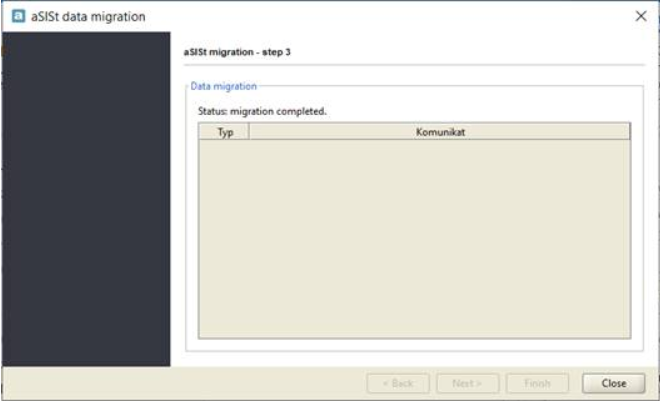
Next step is summary:
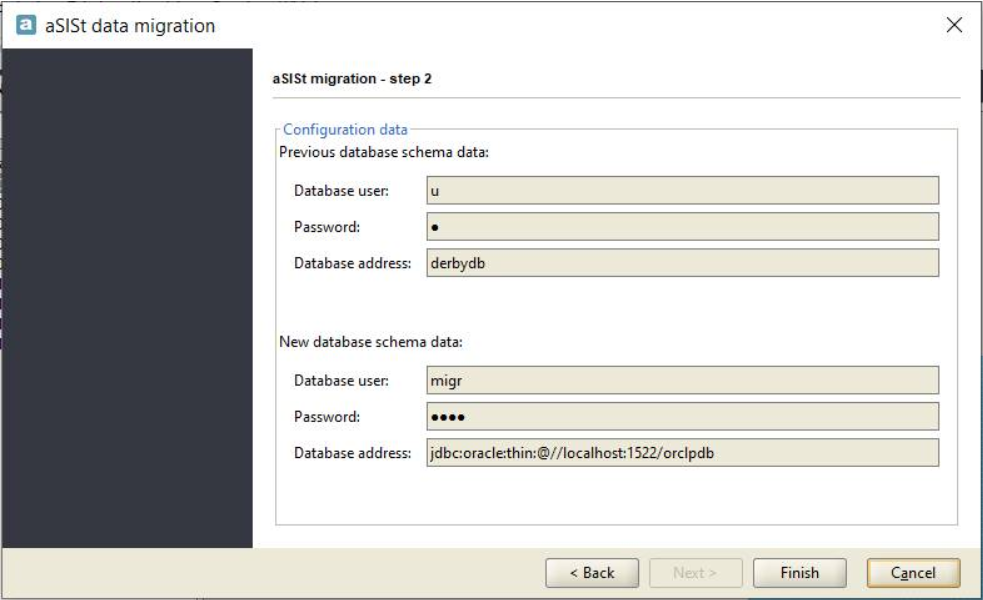
Use the “Finish” button.
The following information will be displayed:
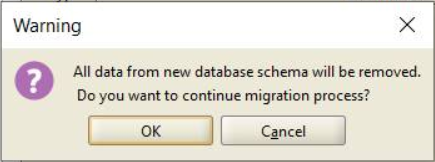
The migration process should take a few minutes. Error messages should not be displayed.
How to reset the Oracle database password (ORA-28001 error)?
Error ORA-28001 indicates that the password has expired.
In order to reset the password, on the computer where the Oracle database is located, run the command line start-> run-> cmd
And then perform:
- sqlplus /nolog
- connect / as sysdba
- ALTER USER user_name IDENTIFIED BY new_password;
Note that after resetting the password, you must enter it in the window displayed when you start the aSISt application.
What does the “ORA-12519: TNS: no appropriate service handler found” error mean when trying to start the application?
In case of a database error „ORA-12519: TNS: no appropriate service handler found” when the next user cannot log in to the aSISt application, despite having the appropriate multi-user license, perform the following actions:
1. Verify the current database settings by following the steps below:
- Log in through sqlplus as the sysdba aSISt database
- Perform the query: +
select current_utilization, max_utilization, limit_value from v$resource_limit where resource_name = ‚processes’;
If the current_utilization obtained is close to the set parameter of the “processes” database specified by the limit_value value from the above query, this may be the reason for the inability to connect another user to the aSISt application. One user log in does not create only one process / session based on Oracle. It involves launching other internal base processes running in the background, as well as database server processes whose operation is saved to trace_file files, so that in case of internal database errors, we have a stack of their origin, which makes it easier to diagnose the cause of problems.
2. Change the value of the processes parameter
Therefore, we suggest raising the parameter from the limit value to 120 for 5 users who log in to the aSISt application (also to the Oracle database at the same time).
This can be done with a command executed on a user with the sysdba role. To log in as this user:
- Run the command line as an administrator
- Enter the sqlplus command
- In the username field enter / as sysdba
- Run the command
ALTER SYSTEM SET processes = 120 SCOPE = SPFILE;
The session value coupled with the processes parameter will be determined automatically by the Oracle server using a special algorithm.
3. Because the change is saved in spfile (server parameters file), the database must be restarted for the changes to take effect.
Restart can be done by logging into sqlplus as sysdba (login method is presented above):
- Log in as sysdba to the database
- Save changes to aSISt and log out of the application
- Close the database – shutdown immediate
- Assemble and open the database – startup
4. If the parameter value is insufficient, you can increase its level again (point 2) and then restart it again (point 3).
How can you enable ARCHIVELOG mode for an Oracle database and define the FRA area settings?
To enable the ARCHIVELOG mode:
- run the SQL command interpreter, eg. sqlplus.exe:
issue the command -> Start Menu -> Run -> „sqlplus.exe /nolog”
- using the „connect SYS/hasło as SYSDBA” command, connect the interpreter to the default instance of the Oracle database (in the Express Edition it is “XE”) as a full SYS user.
- create a target directory for the FRA area and issue the command string:
SHUTDOWN IMMEDIATE
STARTUP MOUNT
ALTER DATABASE ARCHIVELOG;
ALTER SYSTEM SET DB_RECOVERY_FILE_DEST = ‚nazwa_partycji:katalog’;
ALTER SYSTEM SET DB_RECOVERY_FILE_DEST_SIZE = 15G;
ALTER DATABASE OPEN;
Exit
The database will be stopped and then started with the new settings.
What does the “IO Error: The Network Adapter could not establish the connection” error mean when trying to start the application?
„IO Error: The Network Adapter could not establish the connection”,
it indicates that there is no network connection to the server.
In this case, you should check if:
- there are correct entries of server address, port and instance name in the aSISt db.properites subdirectory;
- the port or service is blocked on the ORA server firewall,
- there is no network communication to the server.
Please, restart either database machine, net card or Oracle services. Use command:
netstat -ano
to check if default db port is not blocked by another process.
To kill the process, type its id and then run the command:
taskkill /pid 18264 /f
where 18264 is identification of another process that uses Oracle’s default port.
How to add missing forms in the created report?
If all required forms are not available in the created report, use this function:
“Report” -> “Report settings” -> “Forms”
move the missing forms from the left to the right panel of the window.
Is there any easy way to print all completed forms?
The easiest way to print all completed forms is to use the “Print completed tables” function by selecting the option:
“Table” -> “Print filled tables”
If there are tables in the displayed list for which you want to make changes in the print settings, you can do so without leaving this function, by :
- right-clicking on the selected table and
- after entering the print preview, make the appropriate changes
Changes made to the printing settings will be remembered by the system and taken into account when printing in the following months.
How to copy data from the previous month to the current report?
The function that allows copying data from another month is: “Load data from another report”.
To be able to copy data, you should:
- open the table to which we want to copy the data,
- select: “Table” -> “Load data from another report”,
- indicate the month from which we want to copy the data,
- confirm your choice.
How to execute the upgrade script for the Oracle database?
To execute the Oracle database upgrade script:
- save the oracle.sql file sent by the aSISt support to disk,
- from the command line, run sqlplus (without switches),
- log in using the username and password used to connect to the database in aSISt,
- execute the script with @<script_path> e.g. @C:Oracleoracle.sql,
- save the changes with the commit command.
Where can I check what taxonomy the report was prepared in if the “Report settings” function was disabled?
The “Report settings” function is active only when editing reports, i.e., having the status “editing input data” or “editing in reconciliation mode”.
For non-edited reports, information about the taxonomy for which the report was prepared can be obtained using the “Report details” function selected in the “List of reports” mode, after:
- highlighted in the list of the required report
- selecting “Report” -> “Report details”
How to set non-expiring ORACLE database password for the profile to which the user belongs?
To disable the password expiration option for the Oracle database to which the aSISt application connects, you need to:
1. Run the command line start-> run-> cmd with administrator privileges and execute the commands:
- sqlplus /nolog
- connect / as sysdba
2. Check the asist5 user profile using the command:
- select profile from DBA_USERS where username = ‘asist5’;
The query returns the name of the profile to which the user belongs. Usually it is a profile called DEFAULT, otherwise rename this profile in the command indicated in point 3.
3. Set an unexpired password for the profile to which the user ‘asist5’ belongs, using the command:
- alter profile DEFAULT limit PASSWORD_LIFE_TIME unlimited;
To check whether the password expiration option has been disabled for the user ‘asist5’, run the command:
at sqldeveloper:
- select username, account_status, EXPIRY_DATE from dba_users where username=’asist5′;
If (null) appears in the ‘Expiry_Date’ column, it means that the password will not expire for that user.
in sqlplus:
- select username, account_status, nvl(expiry_date,’null’) from dba_users where username=’asist5′;
If (null) appears in the ‘Expiry_Date‘ column, it means that the password will not expire for that user.
How to check the encoding of a database in Oracle?
The encoding of an Oracle instance can be checked by sending the appropriate queries:
- from the level of aSISt application
- after logging into the Oracle database
I. To check the encoding of the installed Oracle database from within the aSISt application, select:
ALT + A -> aSISt information -> button: ‘SQL Console’
At the top of the displayed window:
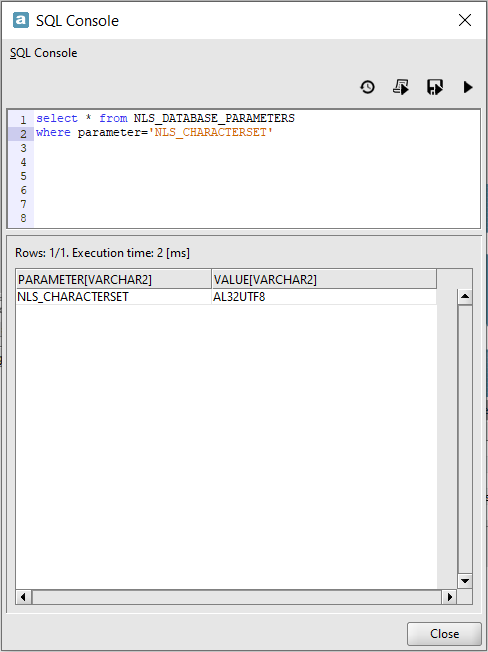
- enter the query:
select * from NLS_DATABASE_PARAMETERS
where parameter=’NLS_CHARACTERSET‘
- select button:

as shown in the following figure:
II. To check the encoding after loging into the Oracle database:
- add the semicolon to the query given above so that it is in the form:
select * from NLS_DATABASE_PARAMETERS
where parameter=’NLS_CHARACTERSET’;
The encoding of the ORACLE database instance, correctly supported by aSISt, is: AL32UTF8.
How to check the version of the ORACLE database?
To check the ORACLE database version on which the aSISt application is running, you need:
- Run the command line as an administrator on the database server
- Enter sqlplus
- In the place where the user should be specified, enter / as sysdba
- Enter the command: SQL*Plus: Release database_version
As a result, you will get information about the version of the Oracle database.
How to repair a damaged Derby database?
Very often problems with the Derby database are due to disk damage, or lack of free space. Before repairing the database, check the hard drive.
To repair the database, you need to:
- Run the recovery.bat file (it is located in the aSISt home directory),
- Answer YES to the question: “Do you want to perform the derby repair process?”,
- Indicate the last backup (for example: asist_backup_5.11_2015-01-15_11-30-32.zip). To repair the database, use a backup that was made from the same application installation.
When the database repair process is complete, an informational message will appear that the database repair is done.
If the damage to the database is too severe, it is not possible to repair it.
How to remove the filters applied to the “List of reports”?
To quickly remove all the search filters you have set, you need to:
- activate the filtering function by choosing:
“View” -> “Show filter”
- select the ‘X‘ icon next to the period filter
After completing the above steps:
- the screen will display a list of all reports in the aSISt database,
- the defined and saved filters will still be visible and possible to use under the ‘Saved filters’ button,
- defined, but unsaved filters will no longer be available.
What address should I send inqueries to if I have problems with the aSISt application?
All inquiries related to the aSISt application, should be directed to: support@asist-xbrl.eu
It can be done:
- by sending an inquiry via the Application Form,
- using a web browser and providing the address: support@asist-xbrl.eu,
- by clicking on: support@asist-xbrl.eu lolated at the top of the screen of the current page.
What can I do to receive emails about new versions of aSISt?
To receive emails about new versions of aSISt, register on the aSISt service website.
A proper registration process requires the following steps:
1. Access to the website: https://support.asist-xbrl.eu/en/
2. Find and select the “REGISTER” function (the function is available on the black bar in the page headline menu)
3. Choose the option:
- aSISt_ENG
4. Provide:
- name and surname
- email address to which information from the Website will be sent
- name of the represented bank
5. Acceptance:
- privacy policy of FINGO sp. z o.o. and regulations for the provision of electronic services
- consent to the processing of personal data for marketing purposes and for sending commercial information by electronic means by FINGO sp. z o.o.
- consent to the processing of personal data for the purposes of sending the form by FINGO sp. z o.o.
6. Perform a mathematical operation and provide the correct result
7. Selecting the “NEXT” button, which will send an account activation message to the email address you provided earlier
8. Opening the message from “aSISt Team” and clicking on the activation link confirming registration at https://support.asist-xbrl.eu/en/
How to add new users to the aSISt application?
From 5.0 version, all changes related to the accounts of previously created users, as well as the addition of new users, are done in the “Users and role” module tab of the “User Account Management” side tab.
To add a new user, use the function:
“User” -> + Add
The following information is required:
- New user names
- Access passwords for added users
- User (role) permissions – by moving the required role to the right panel of the window
It is optional to enter other data in this function.
This function is only available to users with administrator privileges.
How can you log into the newly installed aSISt application?
After starting the aSISt application, a login panel is displayed, where the following data must be entered:
- Login: admin
- Password: admin
these are the default settings with system administrator privileges.
In the next step, add accounts for all users who will be working in aSISt, so that each user can log in to the application through their own account.
What requirements should a computer with aSISt application have?
The hardware requirements for the aSISt application are specified in the document: Specification of hardware requirements for: aSISt, tranSIS systems.
What should I do if my aSISt application is running to slowly?
If your application works to slow, you need to:
- compare aSISt requirements with parameters of your computer.
Requirements for aSISt application are available at: Technical_documentation.
Go to Settings (ALT+A -> Settings), click the tab: LOCAL, and go to the tab:
- Memory management and add more memory moving the slider further, but it is not recommended to move it to the end of the scale (the amount of available memory depends on the amount of RAM available on your computer).
Please notice that the application needs more time when report is opened for the first time with the new taxonomy.
How to check the version of aSISt application?
To check the version of your aSISt application, start the “about aSISt” function by selecting:
Alt-A -> about aSISt
The application window also displays information about the version and type of database (ORACLE or DERBY).
How can I enable blank (greyed out) cells in a report table in aSISt application?
From version 5.16 of aSISt application, it is possible to activate explicit dimensions from cell level (right mouse button – “Enable Cell”).
If function “Enable cell” is unavailable, it means that the cell is inactive due to the taxonomy and cannot be activated.
What do I need to do to transfer aSISt application with Derby database to a new computer?
To transfer the aSISt application from the current computer to the new workstation, you need to:
1. Make a backup of the derby database using the “Preparing backup” function (ALT+A -> “Preparing backup”)
2. Download the full version of aSISt from our website (https://support.asist-xbrl.eu/en/downloads)
3. Install the aSISt application on the new computer using downloaded file
4. From the old aSISt home directory, copy the file to the new aSISt home directory:
- aSISt.license
and catalogue:
- preferences (If you want to have the same user settings on the new workstation as on the old one).
5. Update the aSISt application to the current version using:
- local update (using file(s) downloaded from our website),
- automatic update (If you have an Internet connection and the right address to update the configuration file).
6. On the new computer, upload the backup file that was created from the old database.
7. Go to Settings (ALT+A -> Settings), click the tab: LOCAL, and then go to the tab:
Manage memory and add more memory by moving the slider further, but it is not recommended to move it to the end of the scale (the amount of available memory depends on the amount of RAM available on your computer).
8. On the old computer, rename the db.properties file [for example: db_old.properties], so that even an accidental attempt to run the application on the old computer does not interfere with the current work of aSISt.
When do I need to additionally update the Oracle database? How to update the Oracle database?
When upgrading aSISt application to a full version (when the second value after the point changes, e.g. for upgrading to versions: 5.15, 5.16, 5.17,…) an additional update of the Oracle database is necessary.
To update the Oracle database you need to:
- run the update (local or from the Internet),
- during the update, click “OK”, when asked for the update method: with or without database
Update with database:
- it is only necessary once per workstation
- can be made only if
- aSISt works just on this particular workstation and in addition:
- no other workstations are subject to updates.
When updating next workstations the update applies only to the application.
If you skipped updating the database during the upgrade on the first workstation and updated only the application, the database must be updated during the next workstation upgrade.
If you missed updating the database on all workstations during the upgrade, contact the aSISt support team to request the Oracle database upgrade script, then:
- In CMD run sqlplus,
- Log in using your aSISt Oracle user login and password,
- Run the script using: @<path_for_the_script> i.e. @C:Oracleoracle.sql,
- Save the changes with the command: commit.
How can I check if the update has been downloaded completely from the aSISt website?
Since version 5.16.2 of the aSISt application the link to the checksums file in the lower part of the update package.
To make sure that the downloaded file is correct, create checksums from the file and compare them with the checksums available on our site.
What should I do to transfer the aSISt application with Oracle database to a new computer?
To transfer the aSISt application with an Oracle database, it is necessary to move to a new server:
- Oracle database (It can be done using Oracle tools (standard import and export tools can be used)) and:
- aSISt application
To transfer the aSISt application from the old workstation to the new one, you need to:
1. Download the full version of aSISt from our website (https://support.asist-xbrl.eu/en/downloads)
2. Install the aSISt application on the new workstation using the downloaded file
3. From the old aSISt home directory, copy the flies to the new aSISt home directory:
- aSISt.license,
- db.properties
and catalogue:
- preferences (If you want to have the same user settings on the new workstation as on the old one)
The db.properties file contains information about: the URL to the Oracle database, user name and password for the aSISt user. It is possible to make changes in the file if something is incorrect.
4. Update the aSISt application to the latest version (ALT+A -> Update)
There are two ways to update the aSISt application:
- local update (using file(s) downloaded from our website) or
- automatic update (If you have an Internet connection and the right address for the update configuration file).
5. Go to Settings (ALT+A -> Settings), click the LOCAL tab, and then go to the tab:
Manage memory and add more memory by moving the slider further, but it is not recommended to move it to the end of the scale (the amount of available memory depends on the amount of RAM available on your computer).
What files should I send to the aSISt support team in case of problems with the application?
If you have any problems with the aSISt application, please attach the log file to an email addressed to: support@asist-xbrl.eu
To generate the logs, run the “About aSISt” function (ALT+A -> About aSISt) and in the new window click the “Dump debug data” button.
The “dump.zip” file does not contain report data. It contains information about the operation of the application when problem occurred.